{{ text }}
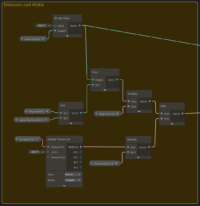 the problem is this shader doesnt work with certain meshes, when I change the mesh component and plug another mesh in, the Alpha becomes 0 and the mesh clips out of the game. The Wrap mode controls what happens if we supply UVs outside the texture bounds - Repeat copies the texture past the bounds; Clamp will round the UVs to the edge of the image; Mirror is similar to Repeat, but the texture gets reflected each time the image bound is crossed; and MirrorOnce is like Mirror, but gets clamped past the first reflection. 1. You can do this without sacrificing efficiency because during the rasterization process, fragments get processed in 2x2 tiles, so its very easy for a shader to calculate values on adjacent pixels in this group of tiles. I don't have any idea about shader programming but right now I need to add alpha to the shader that I want to use. If I disable the one that is visible (the dark one), the other (the light one that glitches out) disappears as well! The node provides three outputs with four, three and two components respectively, depending on the size of the vector you want to create. The nodes in Shader Graph represent data about the objects to which the Material is applied, including their mathematical functions, procedural patterns, and more. Else, the node returns false. Drag out an edge from Alpha to create a Gradient Noise node 5. The following Adjustment nodes are used to tweak the properties of colors. The output, therefore, is always between 0 and 1. You can use this for any effect which requires physically moving the mesh, such as ocean waves, but unfortunately, we cant modify positions of individual pixels/fragments, only vertices. White Balance does strange things to colors. Unity 2023.2.0 Alpha 9 .
 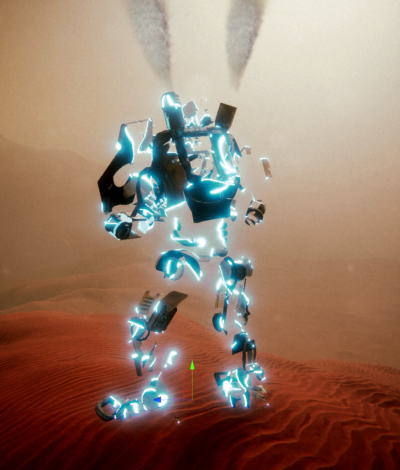 For instance, -0.3 will floor to -1, but it truncates to 0. T is clamped between 0 and 1. The Sphere Mask takes a Coordinate, a position in any arbitrary space, and a sphere represented by a Centre point and a Radius. Alpha is a float between 0 and 1. A Matrix 2 is a 2x2 grid of floating-point numbers. All the outputs are in radians: Arcsine accepts values between -1 and 1 and will return an angle between minus pi over 2 and pi over 2; Arccosine accepts inputs from -1 to 1, but this time returns the angle between 0 and pi; and the Arctangent node takes any Float value as input and returns an angle between minus pi over 2 and pi over 2, like Sine. The Parallax Mapping node can be used to fake depth inside your material by displacing the UVs. For example, the index of refraction for ice is 1.3098, which gives the same strength as the preset for ice. Setting smoothness to 1 results in sharper highlights. The result will be a regular polygon thats been stretched if the width and height are different. In view/eye space, objects are relative to the camera and its forward-facing direction. The Ceiling node is similar, except it takes the next whole number greater than or equal to the input. Go to Assets > Create >Shader Graph > HDRP and click Unlit Shader Graph. This is the Node Settings window. Quite a few nodes are just for retrieving information, so they dont have inputs, only outputs. This is great for combining a base normal texture, A, and a detail normal texture, B, together. The Subtract node, on the other hand, takes the A input and subtracts the B input. WebIm using shadergraph to create a "fade" shader than essentially changes the alpha and alpha threshold to make an object fade out of the scene. Press the plus arrow to add new properties. The output is a Vector 3 representing the calculated normal vector. 1. We can also set the Precision of the property to Single or Half precision, or inherit from the graphs global settings. The Voronoi node is a very pretty and versatile type of noise. Theres an extra tickbox on the node to apply lightmap scaling, which will automatically transform the lightmap texture if ticked its usually best to keep it ticked. If you enjoyed this or learned something, Id appreciate you checking out my YouTube. We can attach one to most of the texture-sampling nodes weve seen so far. The tangent vector lies perpendicular to the vertex normal, and for a flat surface, it usually rests on the surface of the object. Actually I want to fade in and fade out my sprite but it's not in the shader that I use. If you dont fill the UV and Sampler inputs, default values are used. The Arcsine, Arccosine and Arctangent nodes do the opposite - these are the inverse trig functions, and we can use them to get back the angle from our input value (where the input is a valid output value from one of Sine, Cosine or Tangent). We can change the Mode between Default, which just lets us set the float directly; Slider, which lets us define minimum and maximum values to bound the value between; Integer, which locks the value to a whole number; and Enum, which Im not sure what to do with, because its totally undocumented on Unitys site. It returns information about the fog youve defined in the Lighting tabs Environment Settings. If you want it to be a hard border, set it to 1. When one is selected, modifying the sliders, which can run between -2 and 2, changes how much that input channel contributes to the three output channels. Dissolving is one of the most popular visual effects. The output is a float which is an ID used to pick the correct diffusion profile. This was called Albedo in some versions of Shader Graph. The output is a single Vector 2, with the first input in the X component and the second input in the Y component. We need to pass in the Position in object space, and we get the Color of the fog and its Density at that position. Depending on the Definition, the shader acts differently: Shader Feature will strip any unused shader variants at compile time, thus removing them; Multi Compile will always build all variants; and Predefined can be used when the current Render Pipeline has already defined the keyword, so it doesnt get redefined in the generated shader code. Gemma Louise Ilett This works regardless of whether the Surface is set to Transparent or Opaque, so the Alpha block isnt always completely useless on opaque Texel in this context is short for texture element, and can be thought of as analogous to pixel, which itself is short for picture element. The DDX node can be used to take a derivative in the x-direction. Actually I want to fade in and fade out my sprite but it's not in the shader that I use. The curve looks like a series of sharp peaks, like a saw. When you create a new property of this type, its value will be the 2x2 identity matrix, which has ones down the leading diagonal and zeroes elsewhere. These SDF-based shape nodes give you a good starting point for procedural materials. We do this by clicking one of the three buttons labelled R, G and B. The Or node also takes two Boolean inputs. The only output is the UVs after being spherized. The Rotate About Axis node takes a Vector 3 Input and a second Vector 3 representing the Axis to rotate around, as well as a Rotation angle as a float. The Boolean node is like the Integer node, insofar as it doesnt take any inputs. The Matrix 2x2 node lets us define a square matrix with two rows and two columns. Again, in URP, this can only be used by transparent materials. This node tree will cycle through the whole sprite sheet for this character sprite. In floating-point arithmetic, NaN is a special value representing an invalid number. The single output is a new set of UV coordinates after the rotation has been applied. I wont cover the nodes that are contained in the High Definition Render Pipeline package - Ill only be covering those contained within the base Shader Graph package. I wont go into much detail about matrices here, because its a very dense topic but all you need to know here is that we can define our own matrix constants inside the shader. Expected range 0 - 1. If you are having problems with setting the alpha, you must remember to set the tags ( Tags {"Queue"="Transparent" "RenderType"="Transparent" }) and to set the correct blend type ( Blend SrcAlpha OneMinusSrcAlpha ), otherwise your alpha won't make a difference. Theres three nodes under the Gradient tab, and Im sure you can guess that they involve creating and reading color gradients! We can supply a Heightmap, which is a greyscale texture controlling how high or low each part of the surface should be. We can use the Type setting in the middle of the node to switch between Default and Normal, which tells Unity which type of texture were expecting to sample. We can also specify the LOD to sample at lower qualities if we want blurry reflections. Alpha is a float between 0 and 1. Use Step as a threshold on a color or other value. Then youre probably not a physicist. The only output of the node is the selected matrix. On URP, using them wont yield performance benefits over sampling those textures like usual. Finally, we supply a Tile float parameter to tile the UVs before the mapping is applied to the mesh. If T has more than one component, the interpolation is applied per-component, but if it is a single float, then that same value is used for each of A and Bs components. This node, as with many texture sampling nodes, can only be used in the fragment stage of a shader. Certain kinds of panoramic images can be decoded using polar coordinates, which means we can use them for skyboxes or reflection maps. The Reflection Probe node is only defined for the Universal Render Pipeline. The Cells output gives us what Unity calls the raw cell data, although reading the autogenerated code in the documentation, it seems to be colored based on the random x offset for each cell. The Texture 2D Asset node lets us find any Texture 2D defined in the Assets folder and use it in our graph. The In input to the Remap is the same as the T input to the Inverse Lerp on this pair of nodes. The Rectangle node takes an input UV and a Width and Height float, then generates a rectangle with that width and height.
  The desired effect is a transparent object that gets cut outside of a given area. If applied to a sphere, youll see light applied to the edge, which is easy to see on the node preview.

 ";s:7:"keyword";s:39:"unity shader graph alpha clip threshold";s:5:"links";s:519:"Does Kate Middleton Have Hair Extensions,
Capital Grille Watermelon Salad Recipe,
Johnny Kemp Wife,
Surplus Liquidators Napanee,
Articles U
";s:7:"keyword";s:39:"unity shader graph alpha clip threshold";s:5:"links";s:519:"Does Kate Middleton Have Hair Extensions,
Capital Grille Watermelon Salad Recipe,
Johnny Kemp Wife,
Surplus Liquidators Napanee,
Articles U